In this post, we will discuss how you can automatically send a PDF document on Gmail to the users who have responded to your Google Form.
This PDF file can be a certificate, an invitation, or any other personalized document of your choice. The PDF file will be dynamic in nature, and its content will be based on user information filled in Google Forms by the respondent.
If a user responds to your Google Form, a PDF file will be generated using your template document in Google Docs, and the respondent will then receive that same PDF file on their Gmail account. This whole process will be automatic and just requires a one-time setup. This entire process will be made possible by using Pabbly Connect.
Steps to automatically send PDF file on Gmail to your Google Forms respondents
1. Create template document in Google Docs
2. Add dynamic data tags in Google template document
3. Create a Google Form
4. Connect Google Forms with Google Sheets
5. Establish a link between Google Forms and Pabbly Connect
6. Setup Google Docs as the Action App
7. Make the Document Public
8. Generate a PDF file of this Document
9. Share the PDF file on Gmail
Step 1:- Create template document in Google Docs
To create a new document. Go to your Drive dashboard, right-click a blank space, and select ‘Google Docs’ > ‘Blank Document’
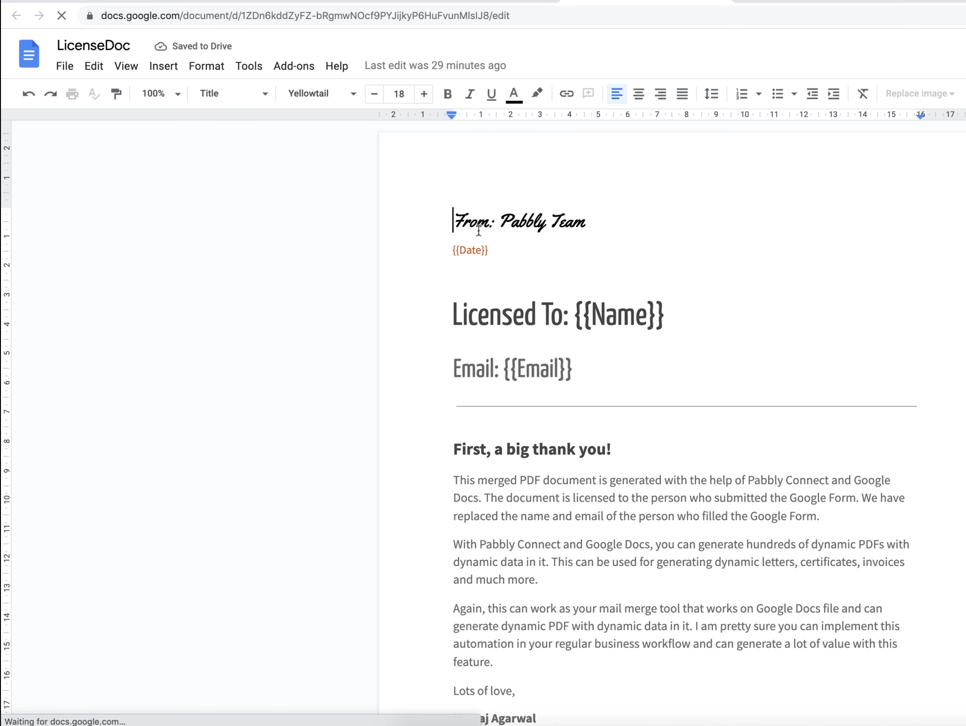
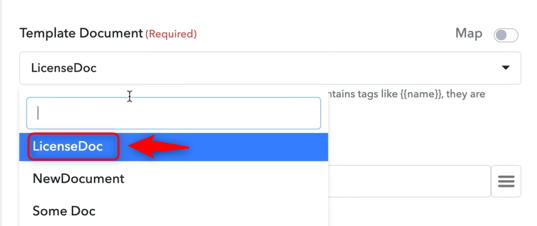
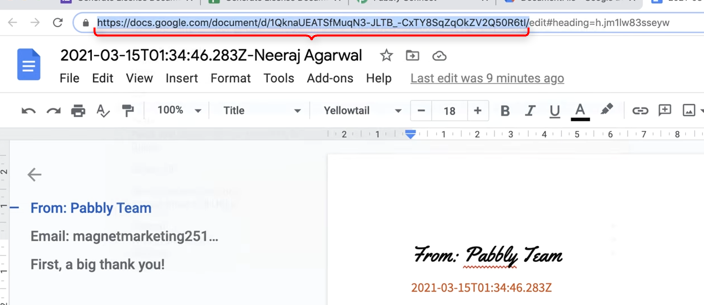
We have created a Google Docs document by the name of, LicenseDoc.
Step 2:- Add dynamic data tags in Google template document
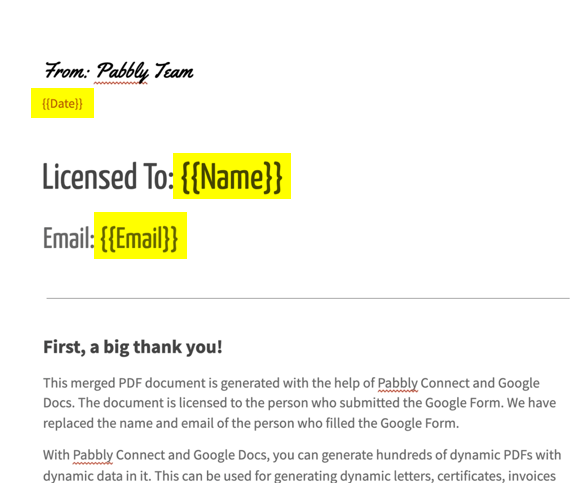
Dynamic Data Tags help us to include variables in our template, these variables will be replaced with actual data in the PDF document. The actual data can be a name, an email address, date, time, ID number etc. To add a dynamic tag to your template, write your variables between double curly braces {{variable}}.
We have also included dynamic data tags {{variable}} in our document. In our case, these tags will be replaced with actual data like the name of the user, their email address and the timestamp of their submission. You can use the dynamic tags per your choice of the variable.
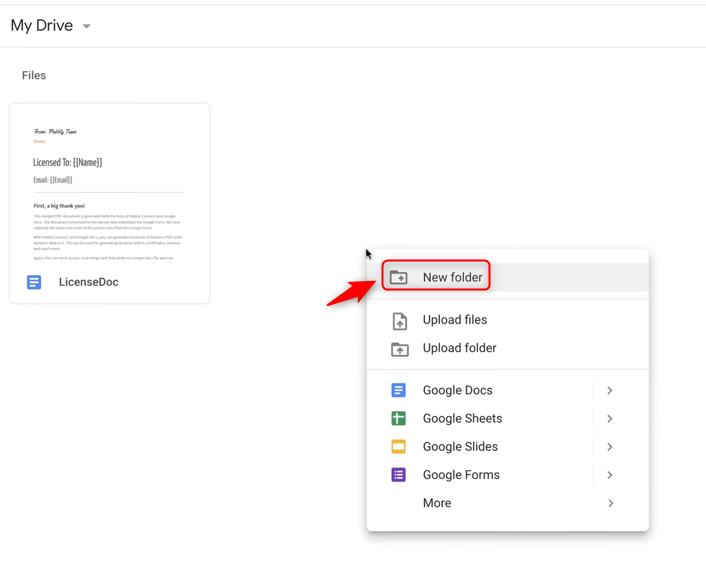
After creating the document, we need a new folder to store those documents.
Create a folder in Drive by right-clicking on the dashboard and selecting ‘New Folder’.
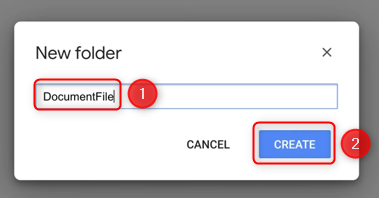
Name your new folder ‘DocumentFile’, and click on ‘Create’. This folder will contain all document files.
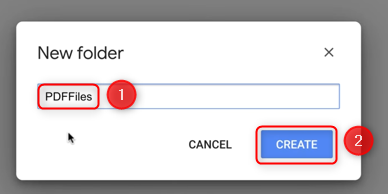
Add another folder, name it ‘PDFFiles’, and click on ‘Create’. This folder will contain all PDF files.
Step 3:- Create a Google Form
To start a new form for collecting the responses, go to Google Forms, and create a ‘Blank’ form.
Edit and Format the form as per your needs. We have added name and email as our fields.
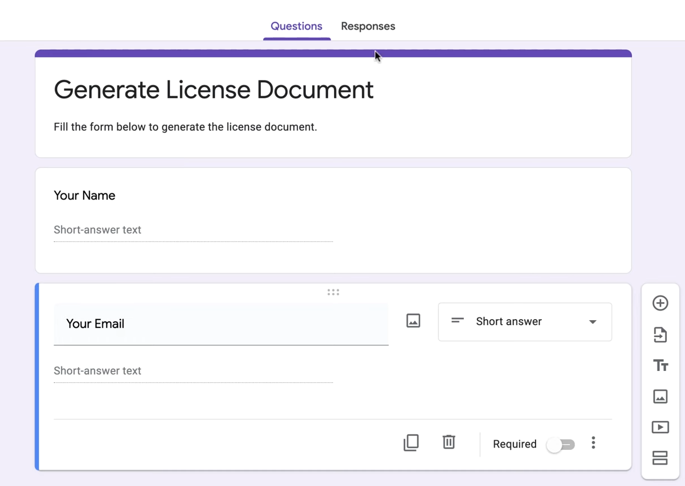
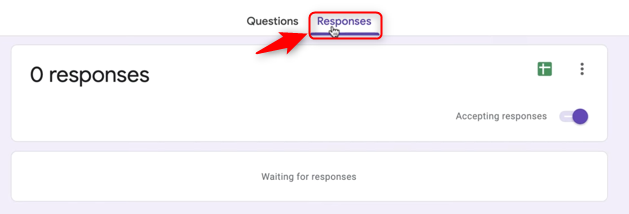
We can view the responses by clicking on ‘Responses’
Step 4:- Connect Google Forms with Google Sheets
We want this data stored in an organized manner in Google Sheets. Also, Pabbly Connect will use this sheet to fetch data in real-time, to make this automation process possible.
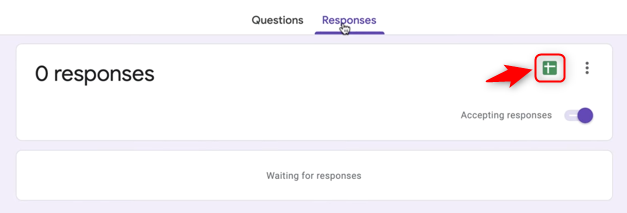
Click the ‘Create Spreadsheet’ button.
Select ‘Create a new spreadsheet’, and click on ‘Create’
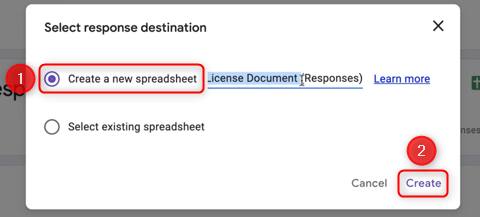
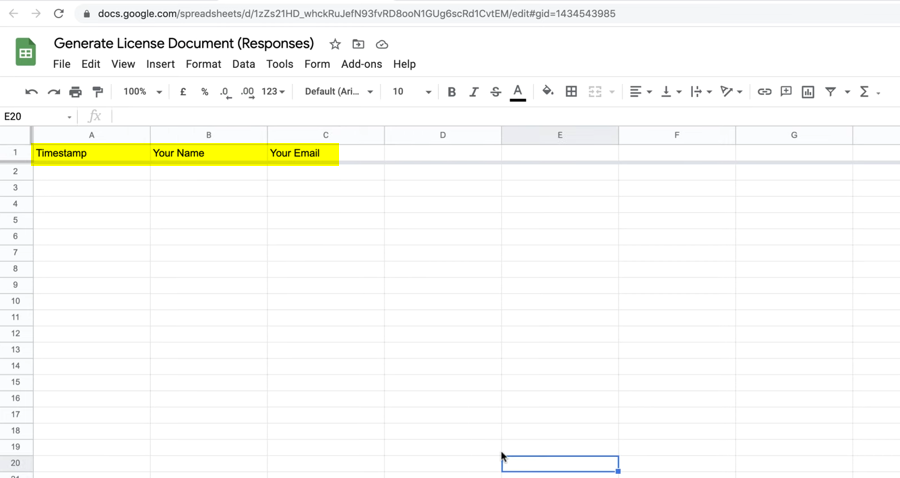
A new spreadsheet is generated with data in its columns corresponding to your Google Form.
Now, the data of your received responses will be automatically sent to Google Sheets. To test this connection let us fill a dummy Google Form.
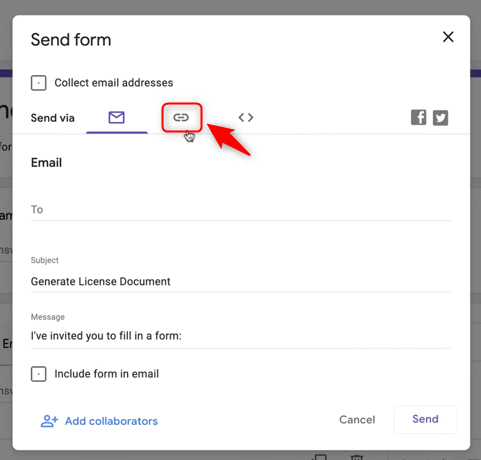
To fill out this dummy form, we need its link. Switch to your Google Forms tab, and click on ‘Send’.

Click on the ‘Link’ logo
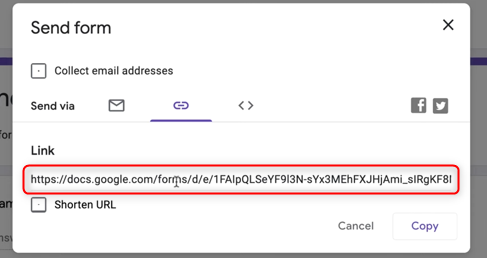
Copy this link,
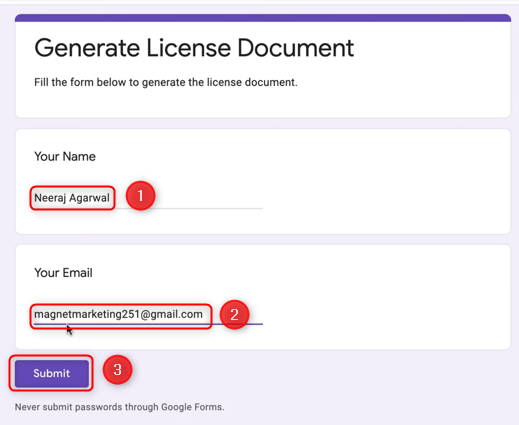
Paste and open it in a separate tab.
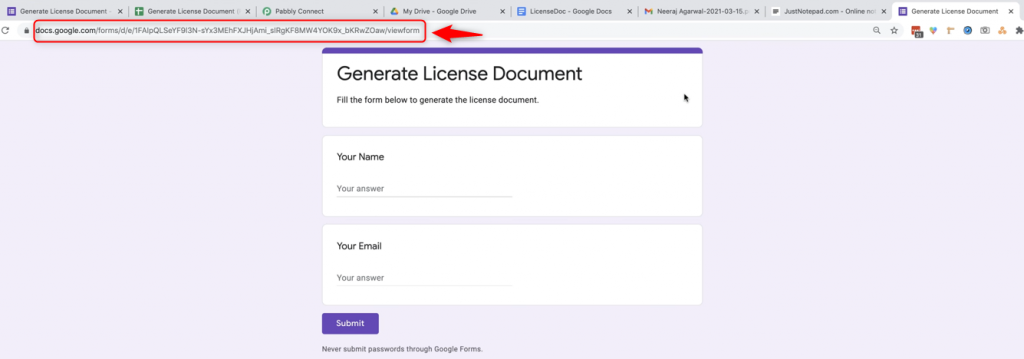
Fill up this form, and click on ‘Submit’
Switch to the Google Sheets tab, and data is now visible.
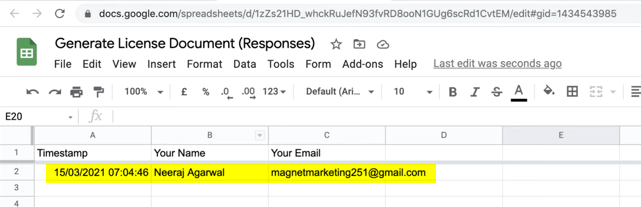
We have now tested the connection established between Google Sheets and Google Forms. Now, if a user submits this form, their data will be automatically stored in Google Sheets.
Step 5:- Establish a link between Google Forms and Pabbly Connect
We will now look at the steps through which we will establish a link between Google Sheets and Pabbly Connect.
A. Sign In / Sign Up
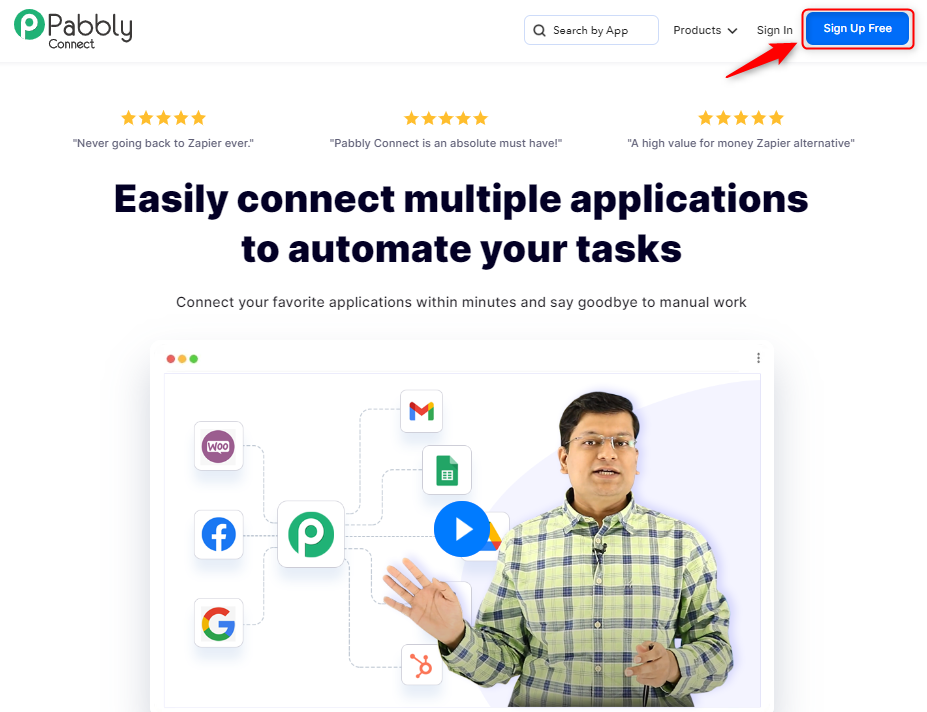
To begin this process, visit Pabbly Connect and create your account by clicking on the ‘Sign Up Free’ button. You can also click on Sign In if you already have an account.
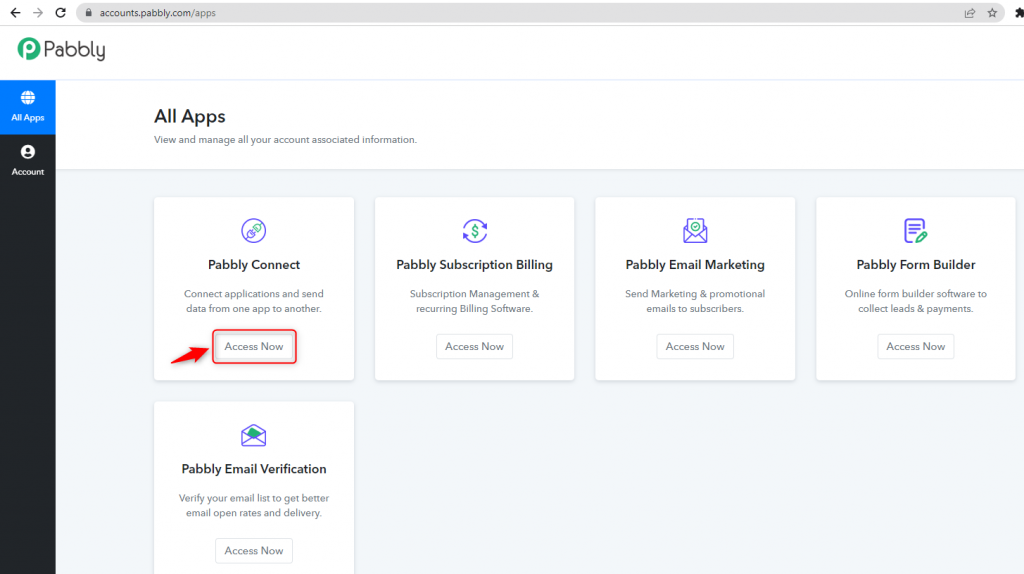
Click on the Pabbly Connect ‘Access Now’ button
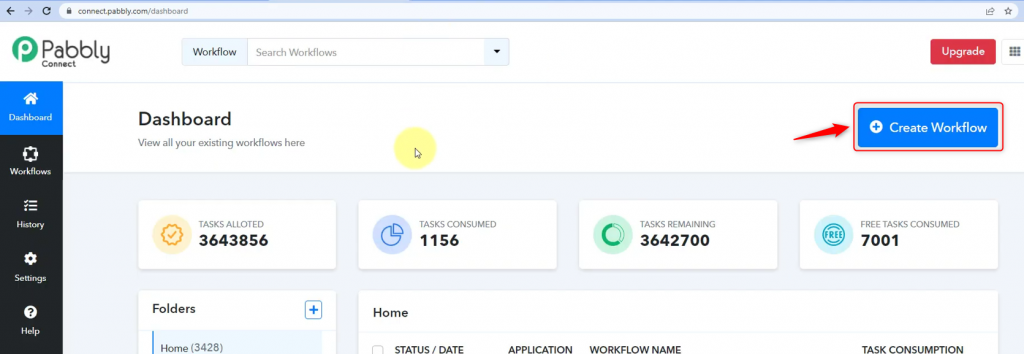
B. Create Workflow
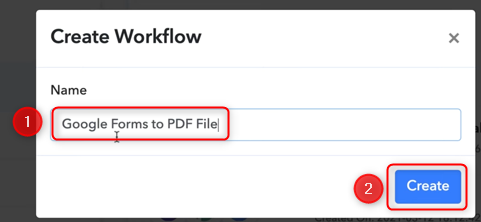
To create a new workflow, click the ‘Create Workflow’ button.
Name your workflow, and click on ‘Create’.
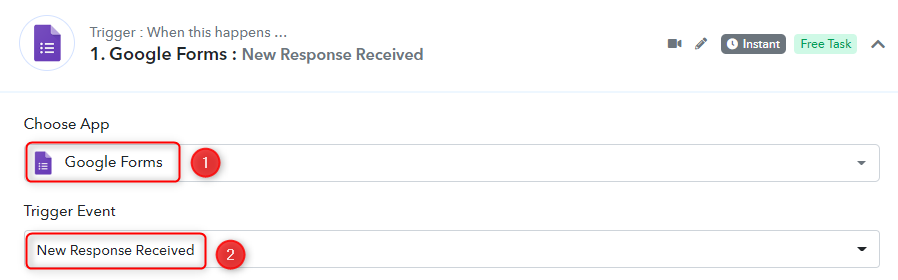
C. Trigger App Setup
Trigger allows us to choose the application that will receive the data for Pabbly Connect. In our case, it would be Google Forms.
Expand the trigger window and choose ‘Google Forms’ as your trigger application, and select ‘New Response in Spreadsheet as your trigger event. This will generate a Webhook URL, that will serve as a link between Google Forms and Pabbly Connect.
Copy the Webhook URL. Click the ‘Capture Webhook’ button, and as soon as you do that, Pabbly Connect will start to look for a response from the app we are trying to link it with.
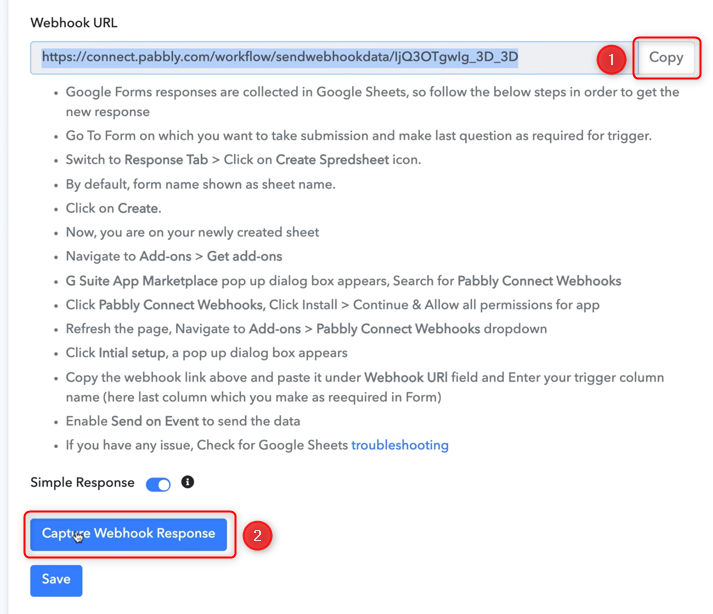
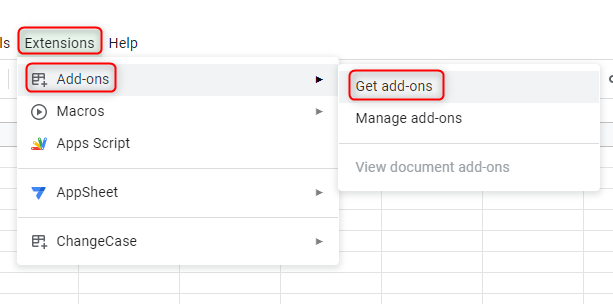
Switch to your Google Sheets tab, and select ‘Extensions’ > ‘Add-ons’ > ‘Get add-ons’.
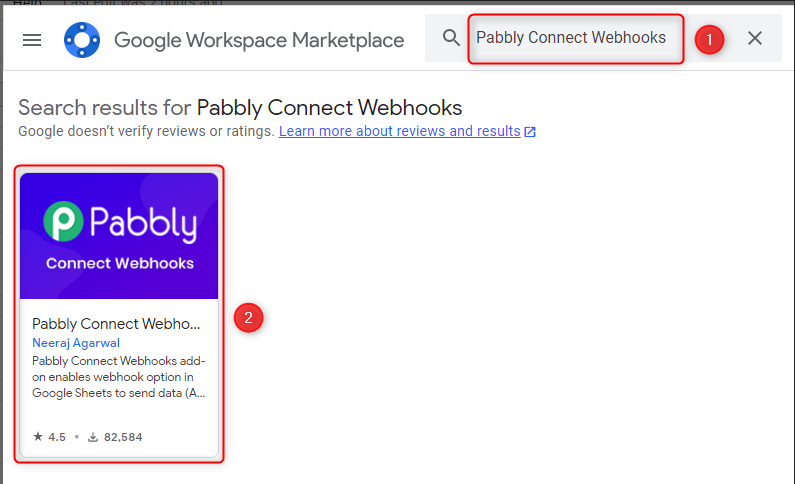
Search for ‘Pabbly Connect Webhook’, and select that add-on.
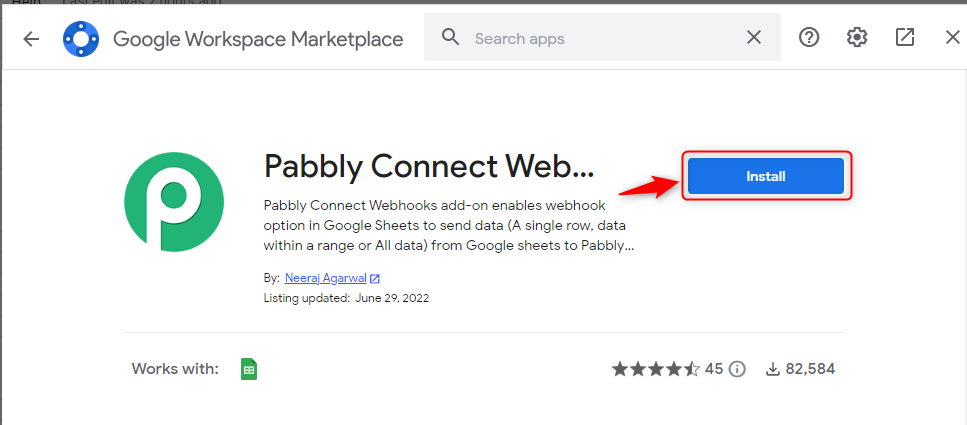
‘Install’ Pabbly Connect Webhook Add-on.
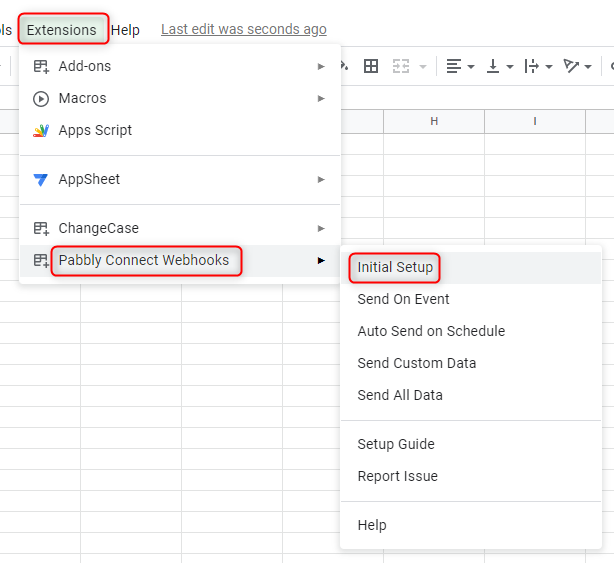
Refresh your page, select ‘Extensions’ > ‘Pabbly Connect Webhook’ > ‘Initial Setup’. This will be a one-time setup.
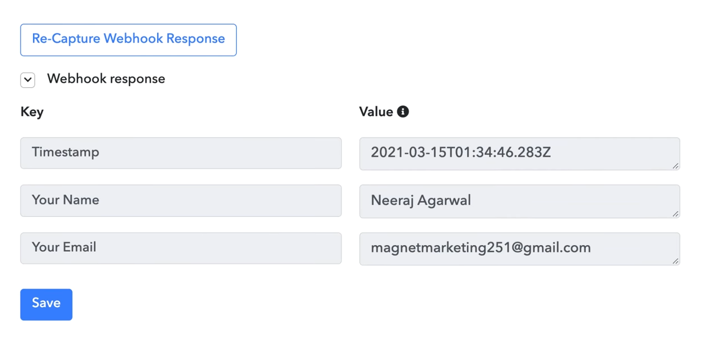
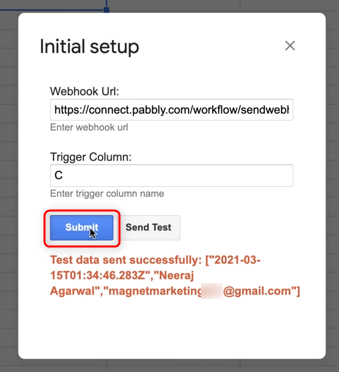
Paste the Webhook URL we copied earlier, and in the Trigger Column, type the name of the last column in which you have data. In our case, it’s column C. Click on ‘Send Test’. This will send a test response to Pabbly Connect.

Go back to Pabbly Connect and check for Webhook response. This confirms the connection between Google Sheets and Pabbly Connect.
Switch back to Google Sheets to ‘Submit’ your Initial Setup
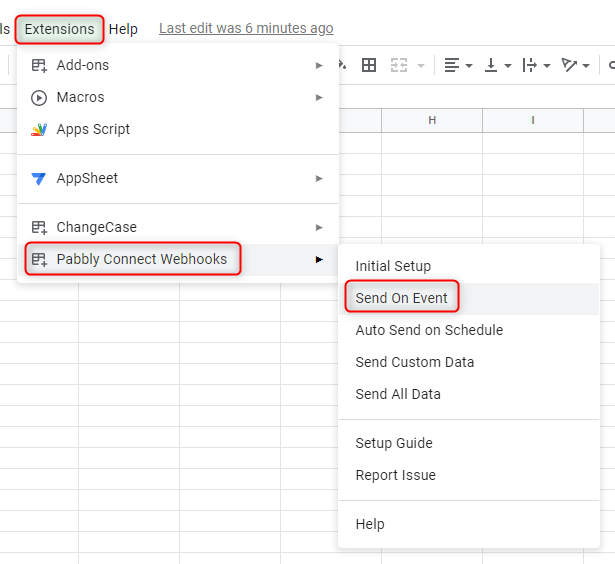
Select ‘Extensions’ > ‘Pabbly Connect’ > enable ‘Send On Event’. This will automatically send the data to Pabbly Connect whenever a new row is added to your Google Sheets.
Step 6:- Setup Google Docs as the Action App
Action allows us to choose the application that will get executed by the workflow trigger.
We essentially want to modify the template in Google Docs with the data received from Google Forms and save that document in the DocumentFile folder. For this, we need to set up Google Docs as our Action App.
A. Google Docs as Action App
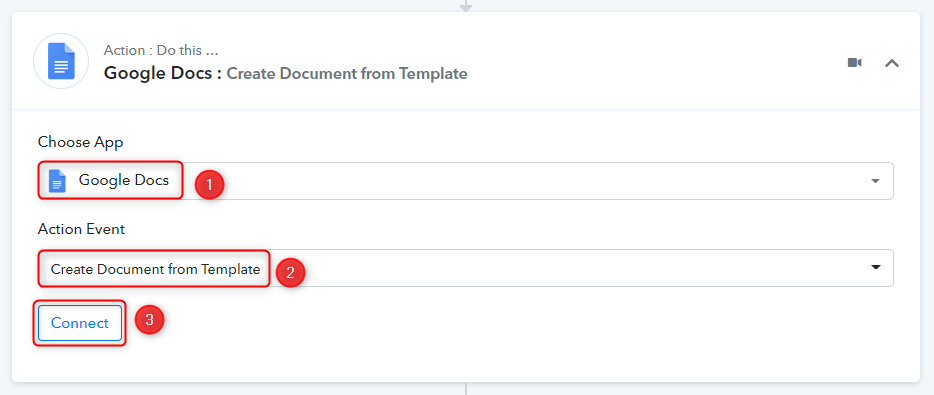
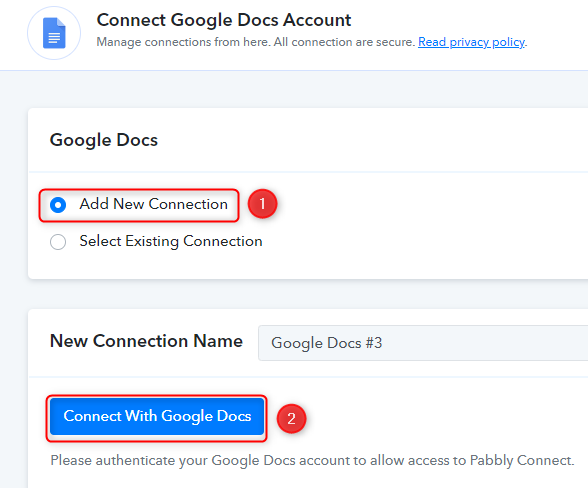
Choose ‘Google Docs’ as your app, select ‘Create Document from Template’ as your Action Event, and click on ‘Connect’.
Choose ‘Add New Connection’, and click on ‘Connect With Google Docs’
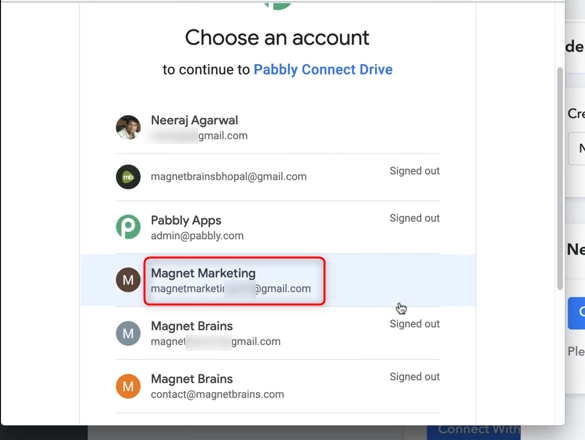
Choose the Gmail account that you want to use.
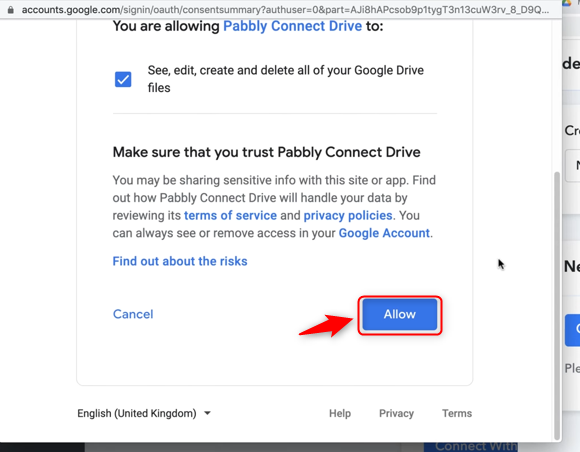
Authorize the connection by clicking the ‘Allow’ button
B. Template Document
Select your Template Document from the list. This is the template whose dynamic tags will be replaced with actual data.
Note: If for some reason your Template Document is not visible, enable Map
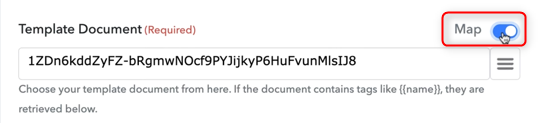
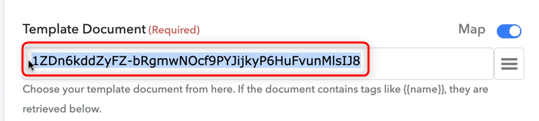
Copy the document ID
Paste the document ID in the Template Document field.
As soon as you select your Template Document, Pabbly will pick fields from the dynamic data tags in your documents.
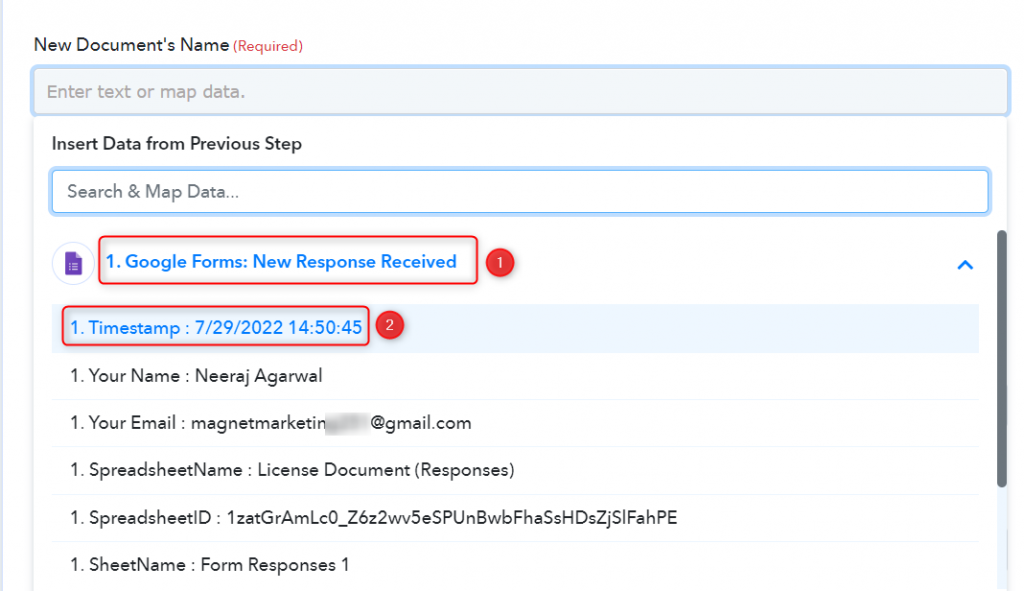
C. New Document’s Name
We want the form submitter’s name and form submission time in New Document’s Name. To do so, we will map ‘Timestamp’ and ‘Your Name’ from above.
To map the ‘Timestamp’, expand ‘Google Forms: New Response Received’ > ‘Timestamp’
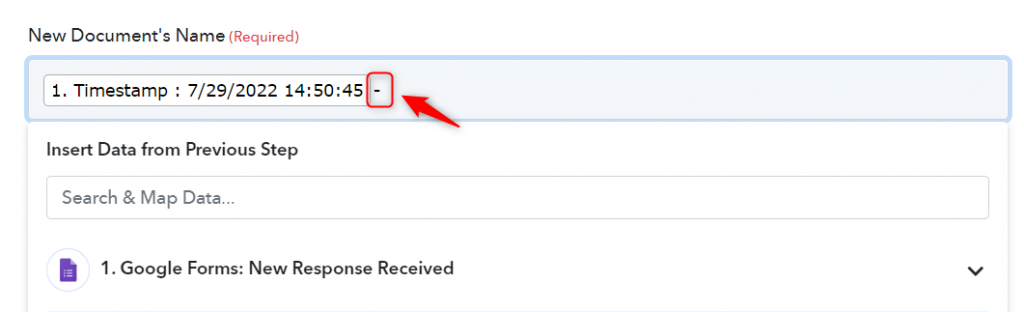
Add a hyphen to separate the name and time.
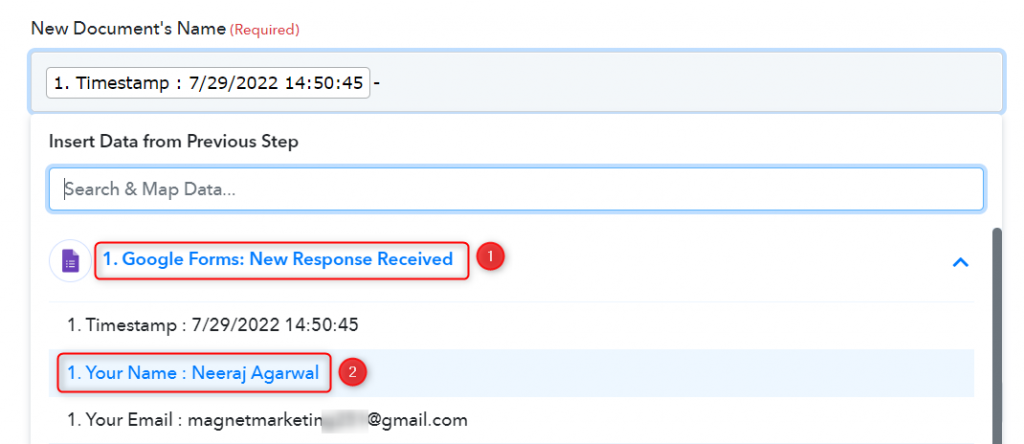
Similarly map ‘Your Name’, expand ‘Google Forms: New Response Received’ > ‘Timestamp’
D. Other Information
Choose your New Document’s Location by selecting a folder. We have chosen ‘DocumentFile’ as our folder.
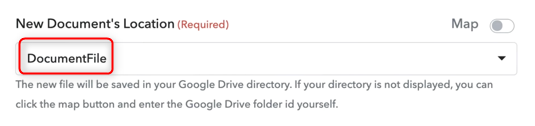
Note: If your folder is not visible in ‘New Document’s Location’, enable Map
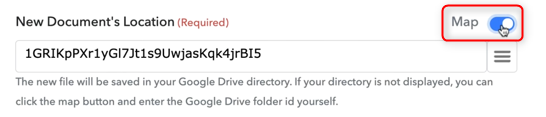
Go to that folder in your Drive

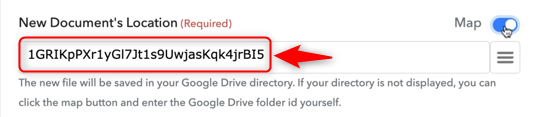
Copy the folder ID,
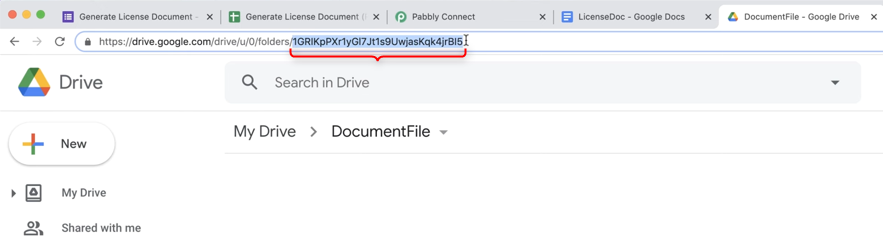
And paste the folder ID in the given field
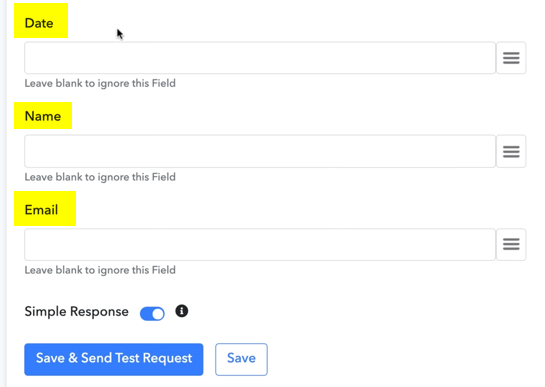
Map the Date, Name and Email from above, and click on ‘Save And Send Test Request’.
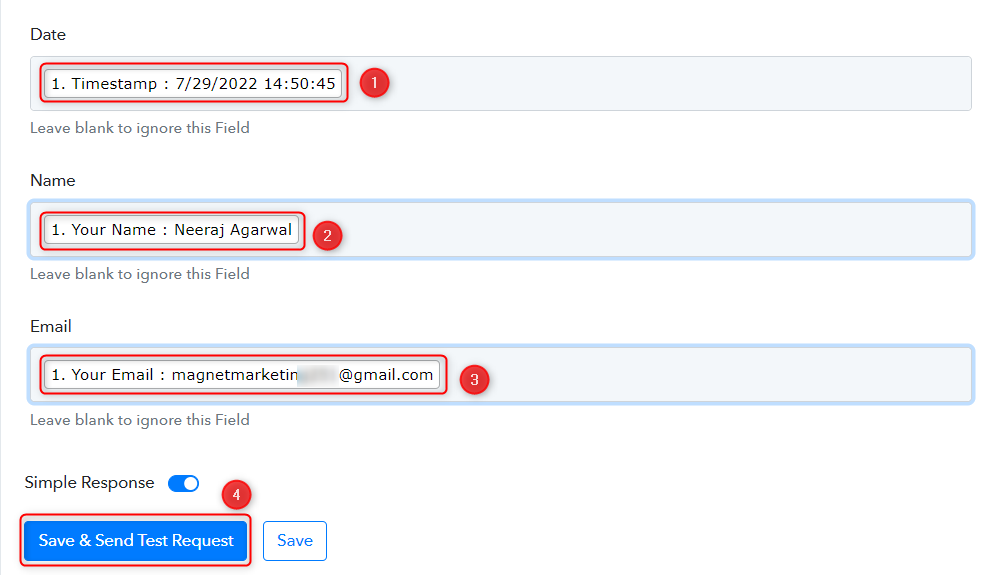
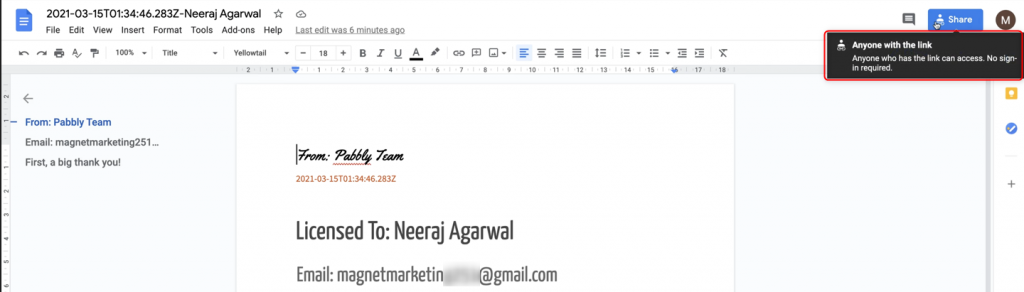
As soon as you do that, go back to Google Drive, and the document will be visible there.
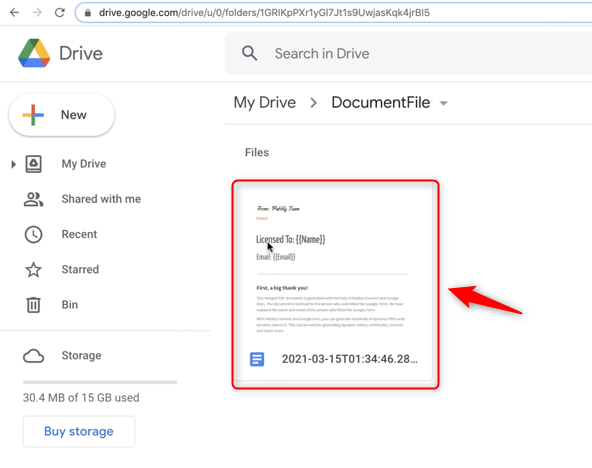
Open the document, see that the dynamic data tags have been replaced with actual data.
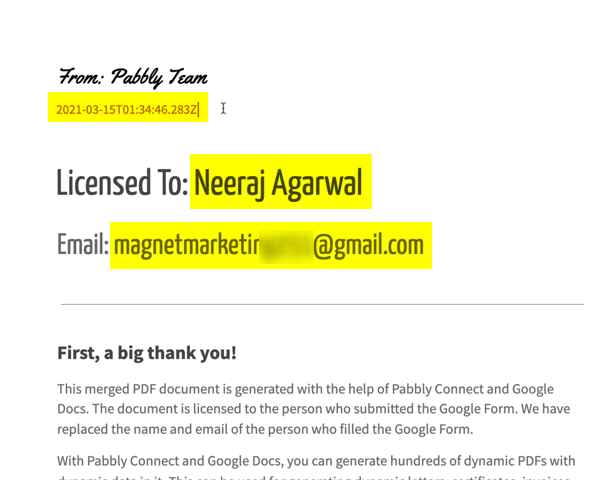
We essentially asked the original LicenseDoc File to replace its dynamic data tags with the data that we sent and save that document with updated data in the DocumentFile folder.
Our next step is to generate a PDF of this updated document. But there is one problem, we cannot generate a PDF of a Private document.
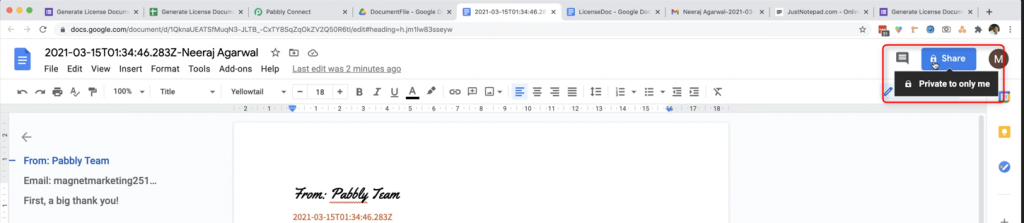
So, first, we need to make the Private document publicly accessible.
Step 7:- Make the Document Public
To make the document public, we will add an action step by clicking the ‘+’ button.
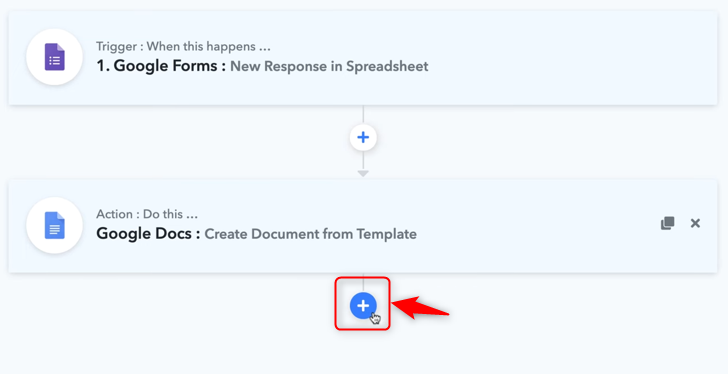
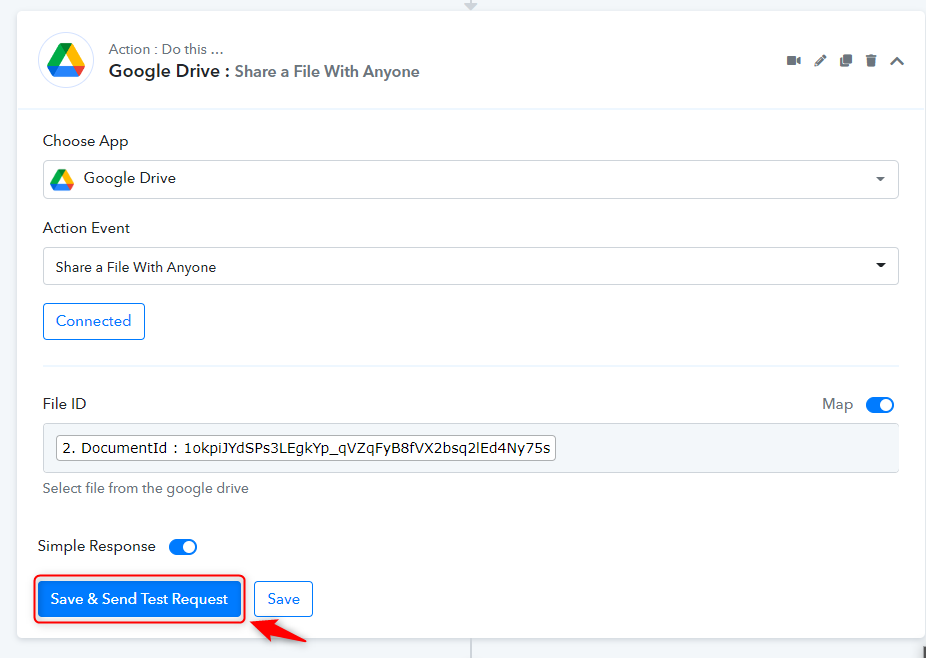
Choose ‘Google Drive’ as your app, select ‘Share a File With Anyone’, and click on ‘Connect’.
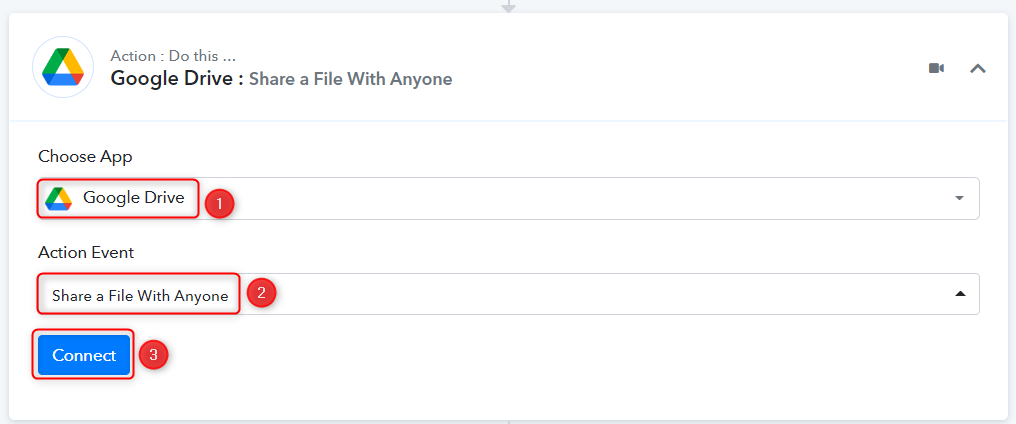
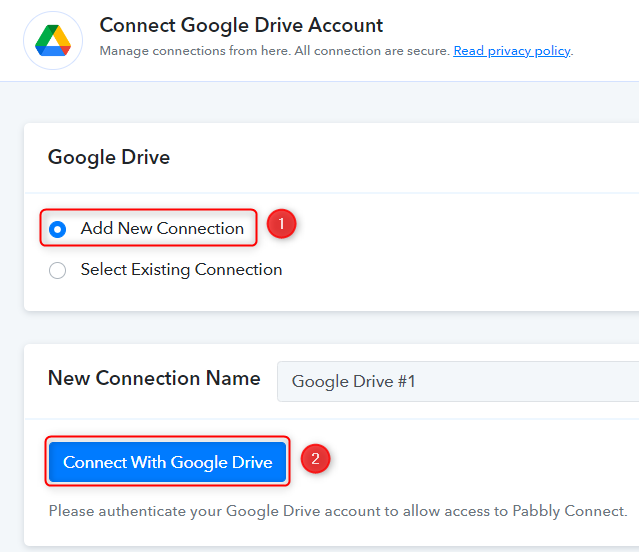
Select ‘Add New Connection’, and click on ‘Connect With Google Drive’. Also, give the authorization.
It will fetch a file ID that was recently created. But this is a manual process, and we want it to be automatic.
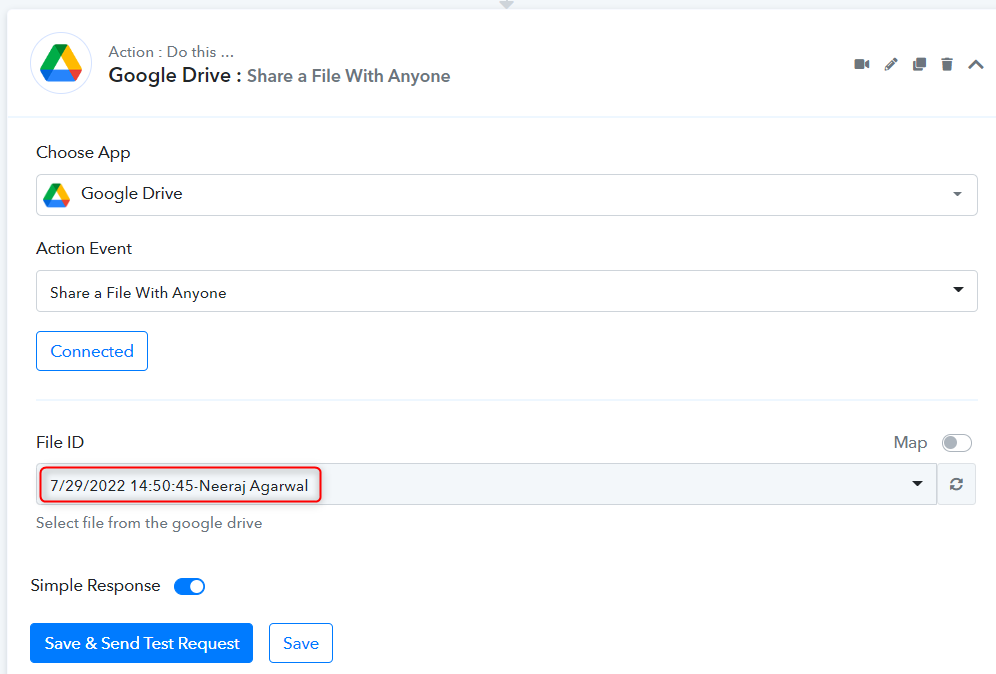
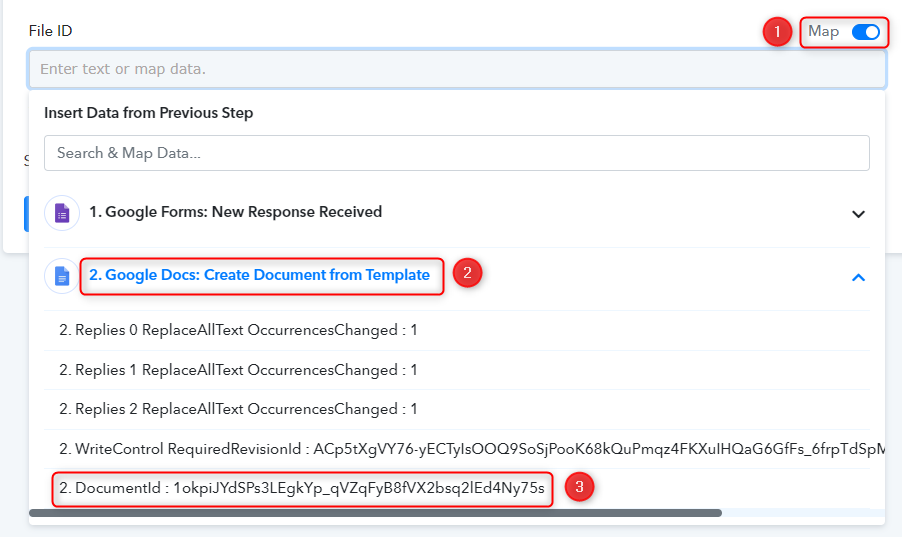
To make this an automatic process. We need to map the document ID from the steps above.
Scroll up to find the Document ID under the Google Docs step.
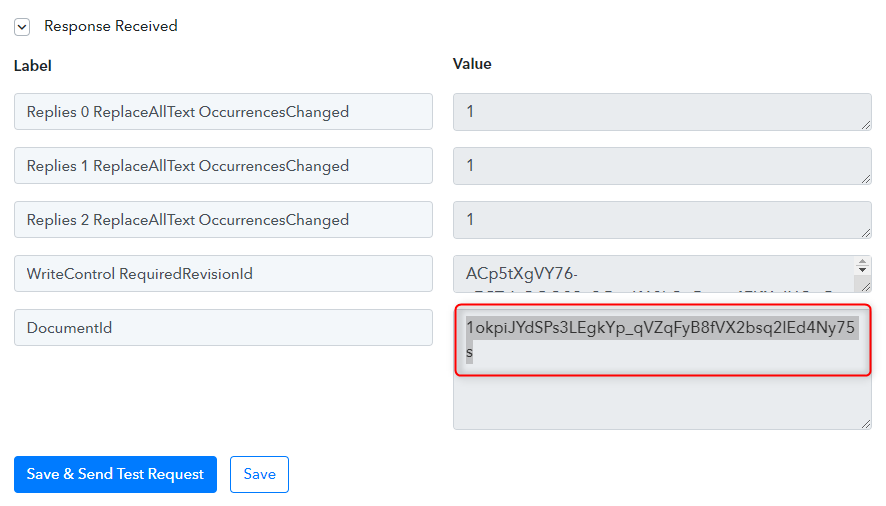
Enable ‘Map’, clear your existing File ID
Map the File ID by clicking on ‘Google Docs: Create Document from Template’ > ‘DocumentId’
Click ‘Save And Send Request’, and your document will be immediately made publicly accessible.
Now the document is publicly accessible, and we can generate a PDF of this document.
Step 8:- Generate a PDF file of this Document
A. Connect with Google Drive to Upload a File
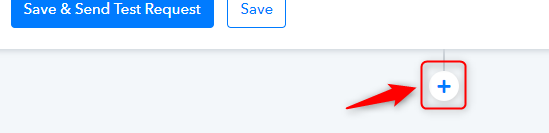
Add a step by clicking the ‘+’ button.
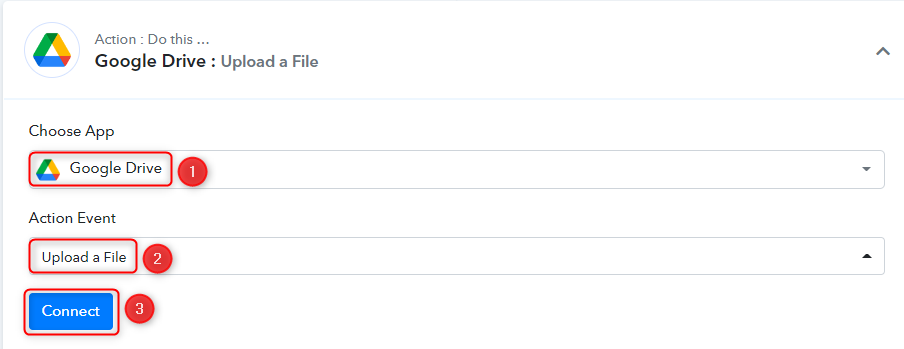
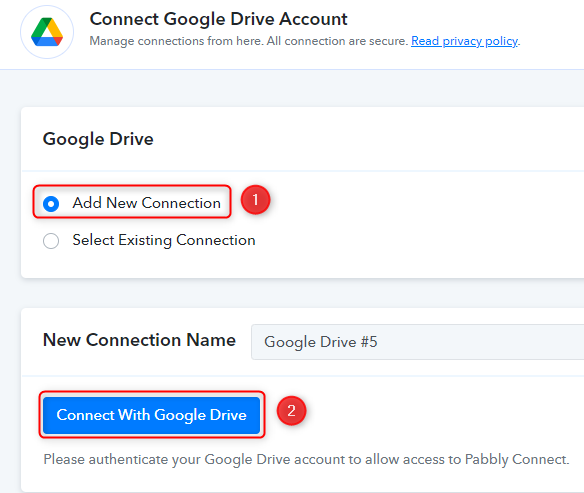
Choose ‘Drive’ as your action app, and select ‘Upload a File’ as an Action Event. Click on ‘Connect’
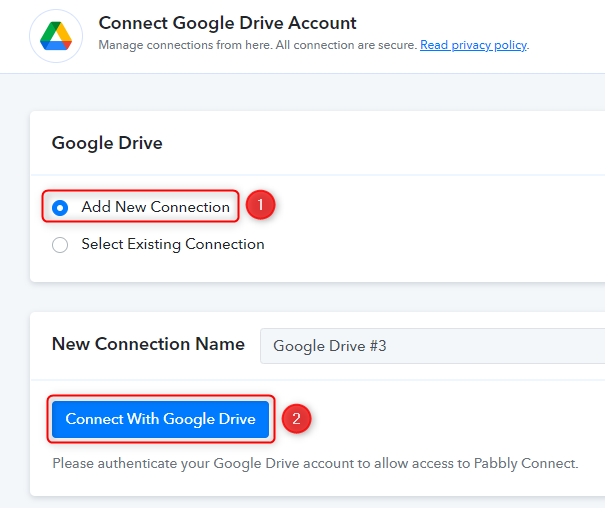
Select ‘Add New Connection’, and click on ‘Connect With Google Drive’. Also, give the authorization.
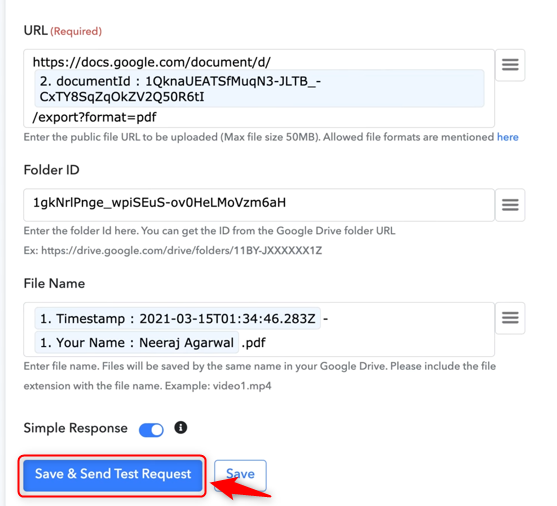
B. Document URL
We now need to fill up the URL, Folder ID and File Name of our document.
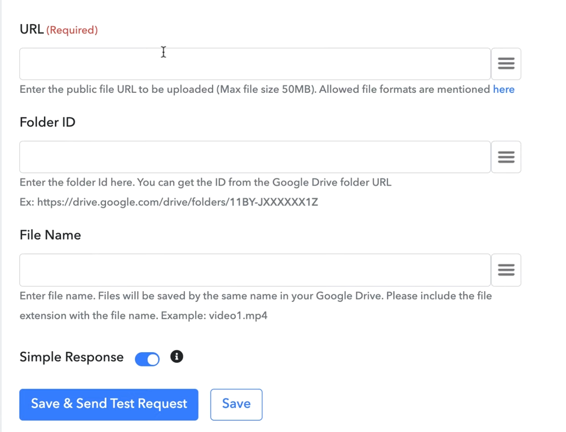
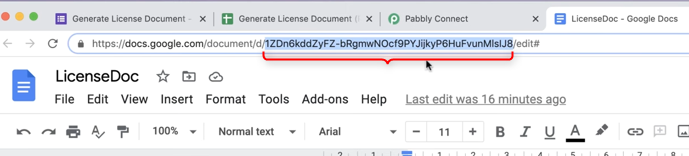
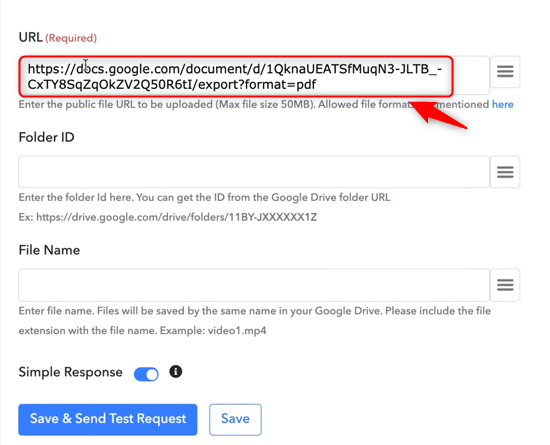
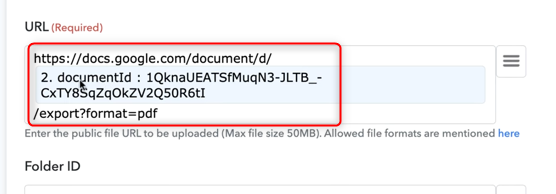
Copy the URL of your document
Paste the URL in a notepad and add ‘export?format=pdf’ to your URL

Copy the entire URL and paste the URL into its specified field.
The document ID in this URL is static, and since we want the process to be automatic, we need to change that static ID to a dynamic ID.
Select the document ID
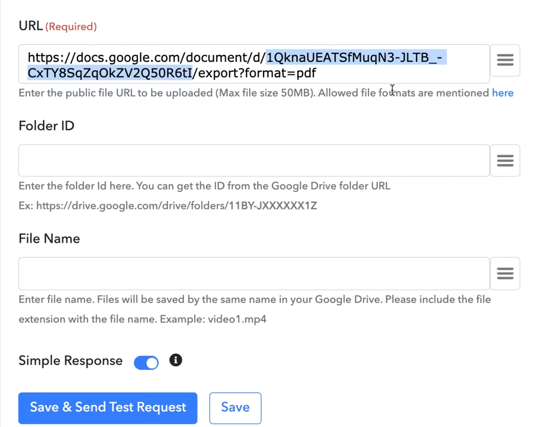
Remove the ID from the URL
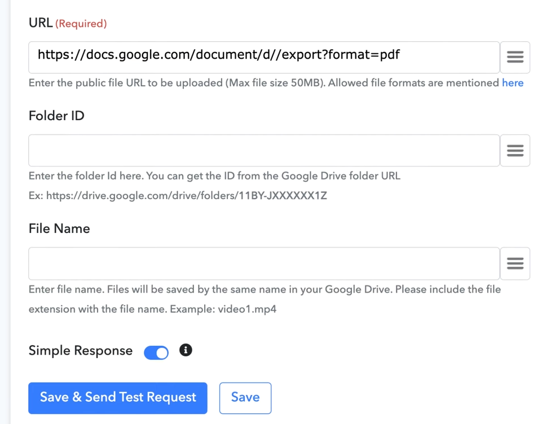
Map the document ID from above

Our static ID is now a dynamic one. This URL will now be used to generate a PDF of your document.
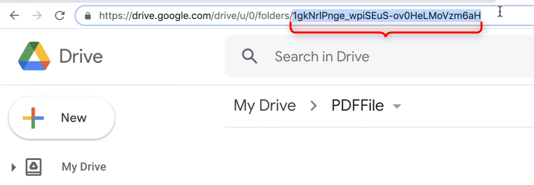
C. Document Folder
Folder ID is the Google Drive folder in which you want to store the generated PDF. In our case, it is PDFFile, the same folder we created in step 1.
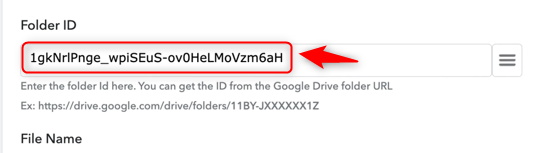
Go to Drive, select the folder you want to store the PDF, and copy the folder ID.
Paste the Folder ID
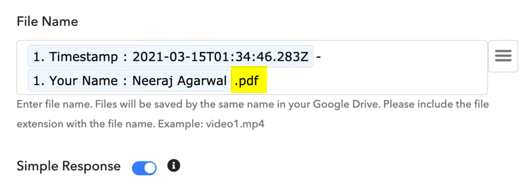
D. File Name
Since we want to include the time of form submission and the responder’s name in our file name, we will map the same from above.
Map Timestamp and Name from above, the same way we did previously.
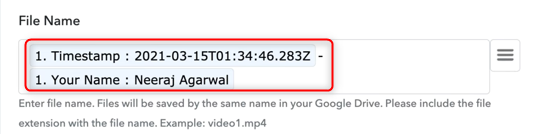
We want this document to be saved as a PDF file so we will add a ‘.pdf’ extension at the end of our file name.
Click ‘Save And Send Test’, and a PDF file will be generated and saved in our folder.
The PDF file stored in our dedicated folder.
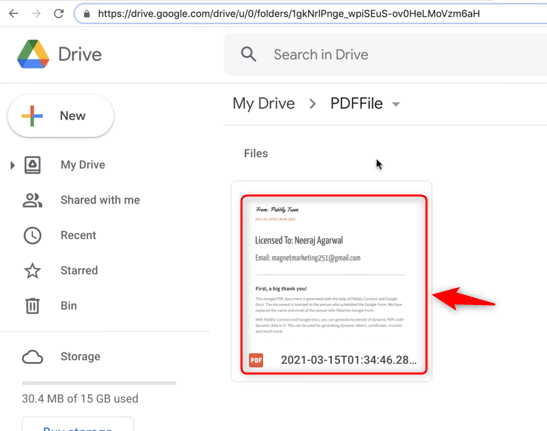
All your PDF files will be visible in this folder whenever a user responds to your Google Form.
Till now, we have set up a Google Form based on the Google Form responses we have created a document from a template in Google Docs, and we have made that file publicly accessible to generate a PDF using that document. All that is left is to share this PDF file with our Google Form respondents.
Step 9:- Share the PDF file on Gmail
To share the PDF file with our Google Form respondents at their email address.
A. Connect with Drive
Add another action step using the ‘+’ button.
Choose ‘Google Drive’ as your app, and select ‘Share a File’ as an action event. Click on ‘Connect’.
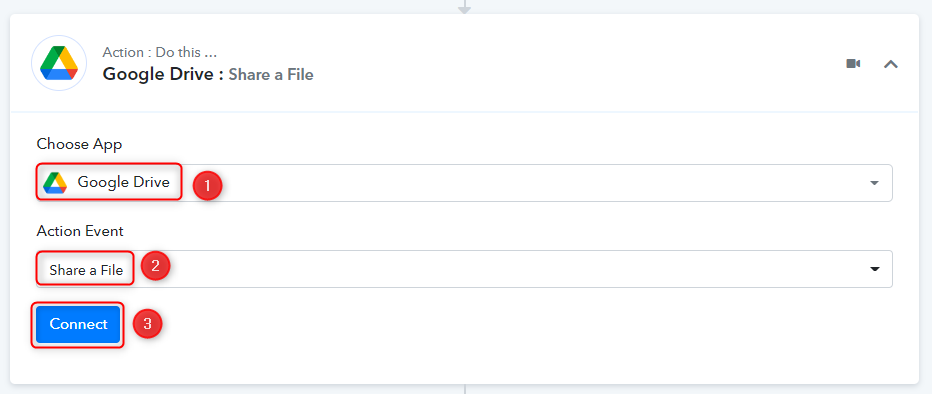
Select ‘Add New Connection’ and click on ‘Connect With Google Drive’. Also, give the authorization
B. File ID
The File ID generated is static we need to change it to a dynamic.

Enable ‘Map’ and clear the file ID
Map the File ID by selecting ‘UploadedFileID’.
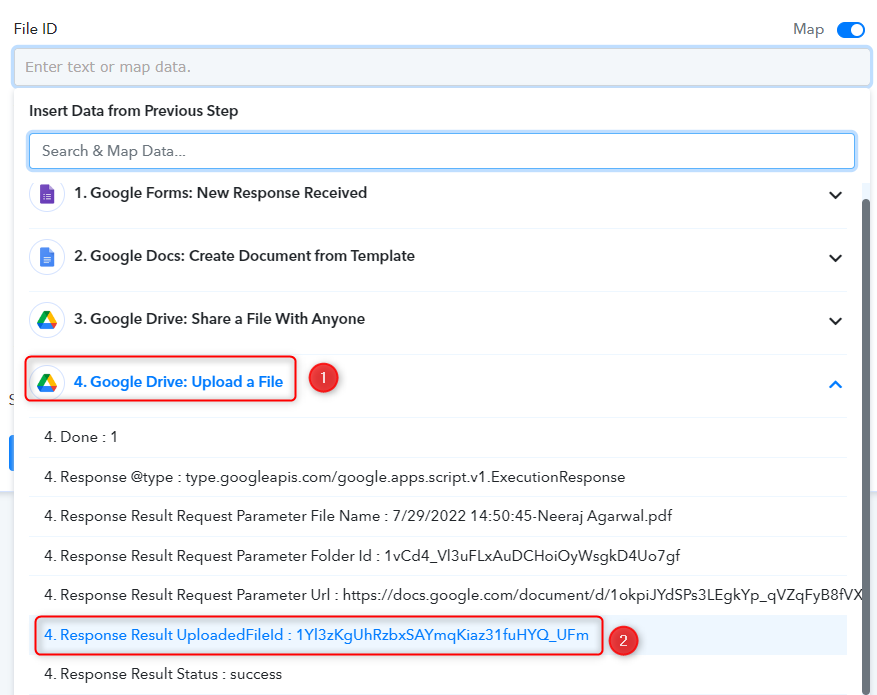
Our File ID is now dynamic

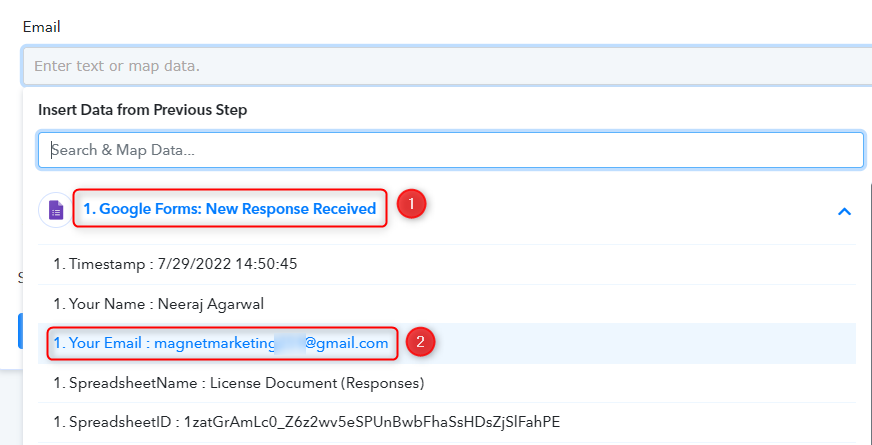
C. Receiver’s Email Address
Map the email address at which the form respondent will receive the PDF file.
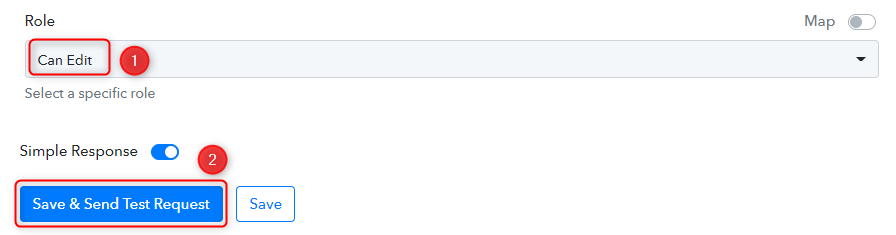
Give the PDF file receiver necessary permission by selecting ‘Can View’ as the Role.
Click on ‘Save And Send Test Request’, and our automation is complete.
Form responded has received the PDF File at their email address.

To recap, we set up a Google Form, based on the Google Form responses we created a document from the template in Google Docs, we made that file publicly accessible to generate a PDF using that document, and at the end, we shared that PDF file with our form respondents on their email address.
Now, whenever a user responds to your Google Form, they will receive a personalized PDF document at their email address, and the fun part is that this entire process is automatic.
Sign Up for a free Pabbly Connect account, and start automating your business.
Subscribe to our Youtube Channel for more such automation.
For any other queries, visit our forum